Opticalpy
光線解析ライブラリOpticalpyでの波長フィルタ、ダイクロイックミラーの設定方法を紹介しました。
今回はOpticalpyでの各種ミラーの設定方法を紹介します。
それでは始めていきましょう。
FlatMirror、Slit
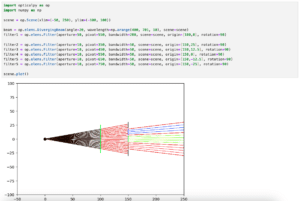
まずは平坦なミラーとして「op.elems.FlatMirror」です。
使い方は「FlatMirror(aperture=ミラーのサイズ, scene=シーン, origin=[Xの位置, Yの位置], rotation=フィルタの角度)」です。
import opticalpy as op
import numpy as np

scene = op.Scene(xlim=(-50, 250), ylim=(-100, 100))

beam = op.elems.DivergingBeam(angle=20, scene=scene)
mirror = op.elems.FlatMirror(aperture=30, scene=scene, origin=(150, 0), rotation=90)

scene.plot()

実行結果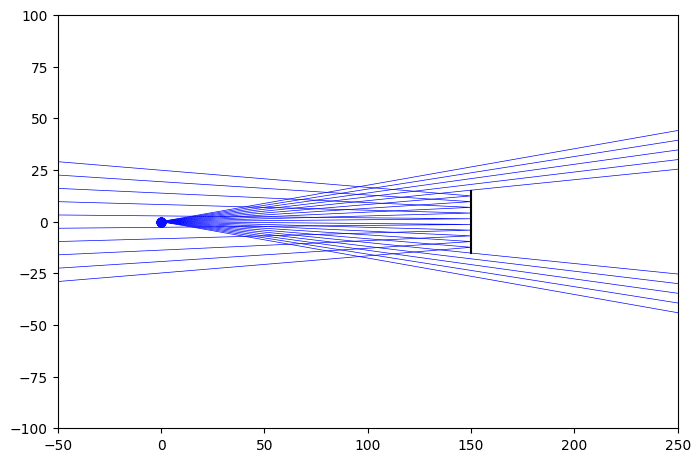
このFlatMirrorの真ん中に穴を開けた形状が「op.elems.Slit」です。
使い方は「Slit(full_size=ミラーのサイズ, slit_width=スリットのサイズ, scene=シーン, origin=[Xの位置, Yの位置], rotation=フィルタの角度)」です。
import opticalpy as op
import numpy as np

scene = op.Scene(xlim=(-50, 250), ylim=(-100, 100))

beam = op.elems.DivergingBeam(angle=20, scene=scene)
mirror = op.elems.Slit(full_size=50, slit_width=10, scene=scene, origin=(150, 0), rotation=90)

scene.plot()

実行結果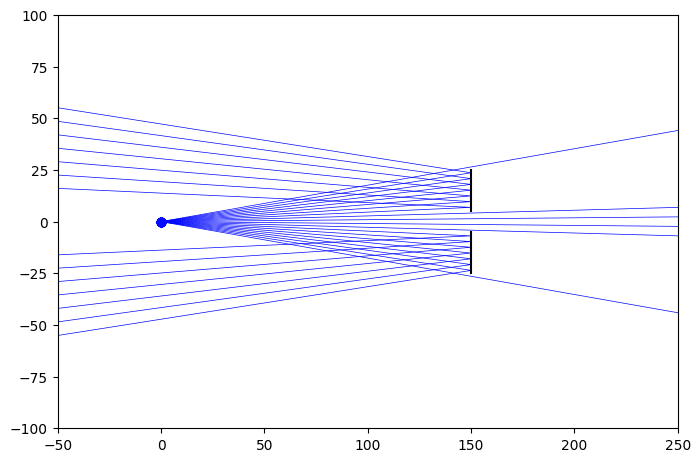
SphericalMirror、SphericalMirrorHole
「Spherical」は「球状の」という意味なので、「op.elems.SphericalMirror」は球状のミラーを、また「op.elemsSphericalMirrorHole」はその中心に穴が空いたミラーを示しています。
まず「op.elems.SphericalMirror」ですが、こちらは「SphericalMirror(radius=曲率半径, aperture=ミラーのサイズ, scene=シーン, origin=[Xの位置, Yの位置], rotation=フィルタの角度)」のように設定します。
import opticalpy as op
import numpy as np

scene = op.Scene(xlim=(-50, 250), ylim=(-100, 100))

beam = op.elems.DivergingBeam(angle=20, scene=scene)
mirror = op.elems.SphericalMirror(radius=15, aperture=20, scene=scene, origin=(150, 0), rotation=90)

scene.plot()

実行結果
また「op.elems.SphericalMirrorHole」ですが、こちらは「SphericalMirrorHole(radius=曲率半径, aperture=ミラーのサイズ, hole=穴のサイズ, scene=シーン, origin=[Xの位置, Yの位置], rotation=フィルタの角度)」のように設定します。
import opticalpy as op
import numpy as np

scene = op.Scene(xlim=(-50, 250), ylim=(-100, 100))

beam = op.elems.DivergingBeam(angle=20, scene=scene)
mirror = op.elems.SphericalMirrorHole(radius=15, aperture=20, hole=5, scene=scene, origin=(150, 0), rotation=90)

scene.plot()

実行結果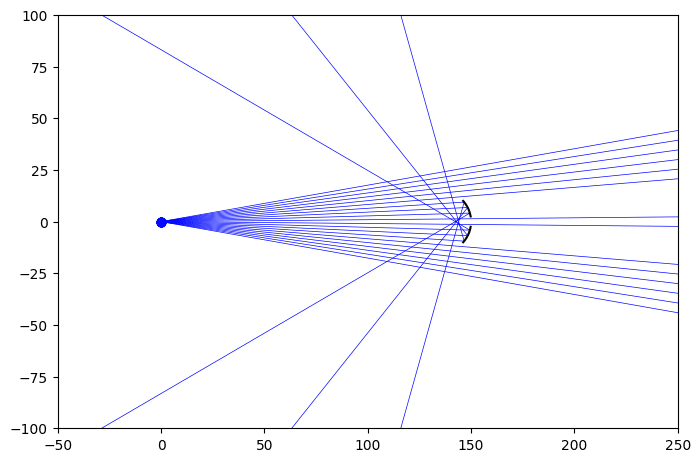
HyperbolicMirror、HyperbolicMirrorHole
「Hyperbolic」とは「双曲線の」という意味なので、「HyperbolicMirror」とは「総曲線の形状をしたミラー」ということのようです。
前にも少し紹介しましたが、元々Opticalpyは望遠鏡のレンズの設計や天文学的な解析などを得意としているようなので、こういった形状のミラーが用意されているのだと思われます。
「op.elems.HyperbolicMirror」として「HyperbolicMirror(radius=曲率半径, aperture=ミラーのサイズ, scene=シーン, origin=[Xの位置, Yの位置], rotation=フィルタの角度)」のように設定します。
import opticalpy as op
import numpy as np

scene = op.Scene(xlim=(-50, 250), ylim=(-100, 100))

beam = op.elems.DivergingBeam(angle=20, scene=scene)
mirror = op.elems.HyperbolicMirror(radius=15, aperture=30, scene=scene, origin=(150, 0), rotation=90)

scene.plot()

実行結果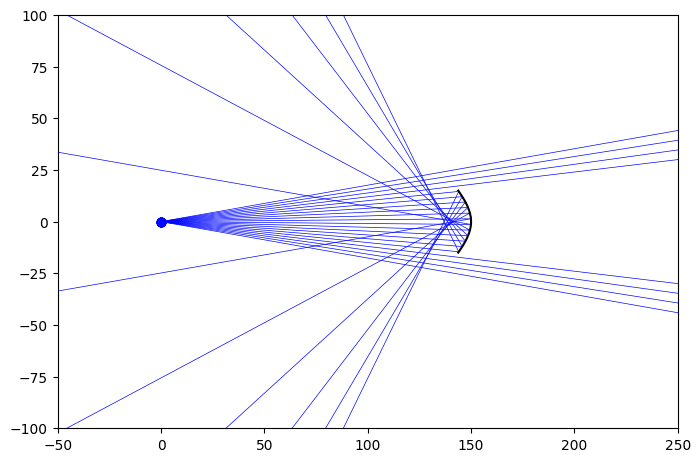
このミラーの中心に穴を開けた形状が「op.elems.HyperbolicMirrorHole」です。
「HyperbolicMirrorHole(radius=曲率半径, aperture=ミラーのサイズ, hole=穴のサイズ, scene=シーン, origin=[Xの位置, Yの位置], rotation=フィルタの角度)」として設定します。
import opticalpy as op
import numpy as np

scene = op.Scene(xlim=(-50, 250), ylim=(-100, 100))

beam = op.elems.DivergingBeam(angle=20, scene=scene)
mirror = op.elems.HyperbolicMirrorHole(radius=15, aperture=30, hole=5, scene=scene, origin=(150, 0), rotation=90)

scene.plot()

実行結果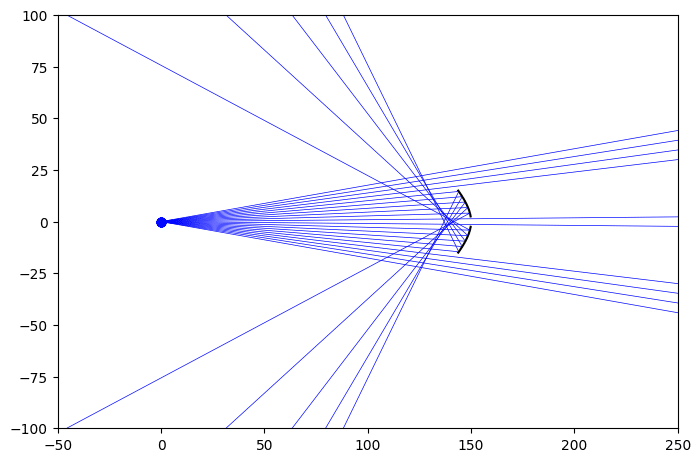
ParabolicMirror、ParabolicMirrorHole
「Parabolic」とは「放物線状の」という意味なので、「op.elems.ParabolicMirror」は放物線の形状をしたミラーを、さらに「op.elems.ParabolicMirrorHole」はその中心に穴が空いた形状のミラーを指します。
まず「op.elems.ParabolicMirror」では「ParabolicMirror(focal=焦点距離, aperture=ミラーのサイズ, scene=シーン, origin=[Xの位置, Yの位置], rotation=フィルタの角度)」のように設定します。
import opticalpy as op
import numpy as np

scene = op.Scene(xlim=(-50, 250), ylim=(-100, 100))

beam = op.elems.DivergingBeam(angle=20, scene=scene)
mirror = op.elems.ParabolicMirror(focal=15, aperture=30, scene=scene, origin=(150, 0), rotation=90)

scene.plot()

実行結果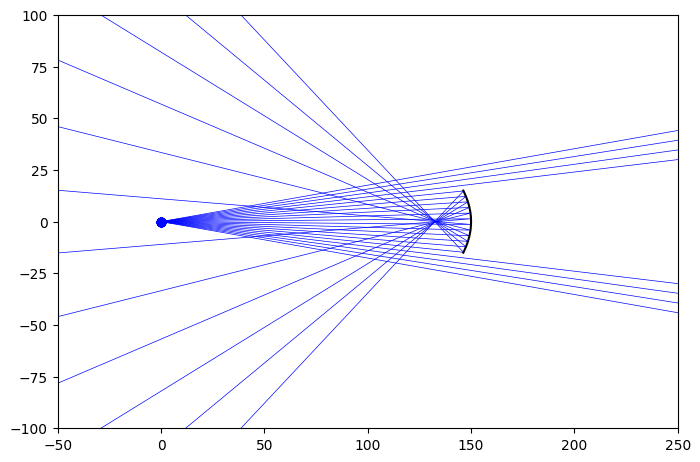
また「op.elems.ParabolicMirrorHole」は「ParabolicMirrorHole(focal=焦点距離, aperture=ミラーのサイズ, hole=穴のサイズ, scene=シーン, origin=[Xの位置, Yの位置], rotation=フィルタの角度)」のように設定します。
import opticalpy as op
import numpy as np

scene = op.Scene(xlim=(-50, 250), ylim=(-100, 100))

beam = op.elems.DivergingBeam(angle=20, scene=scene)
mirror = op.elems.ParabolicMirrorHole(focal=15, aperture=30, hole=5, scene=scene, origin=(150, 0), rotation=90)

scene.plot()

実行結果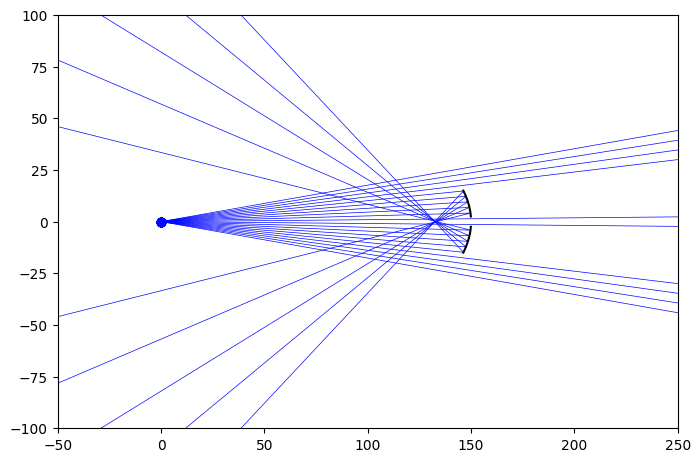
次回はアスキーアートが描けるartライブラリを紹介します。
ではでは今回はこんな感じで。
コメント