並列処理
前回、Pythonでマルチスレッド処理をするためのThreading、そしてconcurrentのThreadPoolExecutorとProcessPoolExecutor(こちらはマルチプロセスですが)の紹介をしました。
ただ前回は処理が軽かったためか、マルチプロセスやマルチスレッドの効果は見られなかったことから、もっと処理を重くして、比較してみることにしました。
用いた基本となるプログラムは前にMatplotlibで大量に画像を出力した際にメモリリークしましたという記事で紹介したプログラムです。
import matplotlib.pyplot as plt
import random
import os
import datetime
import psutil
import csv

num_graph = 1000

data_num = 1000
data_range = [-10, 10]

default_dirpath = os.getcwd()
outputgraph_dirname = 'graph'
outputgraph_dirpath = os.path.join(default_dirpath, outputgraph_dirname)

start_time = datetime.datetime.now().strftime('%Y%m%d%H%M%S')
output_filepath = os.path.join(default_dirpath, f'{start_time}.csv')

def randomData(min_val, max_val, data_num):
    x_list = []; y_list = []
    for i in range(data_num):
        x_list.append(i)
        y_list.append(random.randint(min_val, max_val))

    return x_list, y_list

def graphMake(graph_no, output_filepath, min_val, max_val, data_num):

    print(graph_no)

    x_list, y_list = randomData(min_val, max_val, data_num)

    plt.cla()

    plt.plot(x_list, y_list)

    outputfig_filepath = os.path.join(outputgraph_dirpath, f'{graph_no}.png')
    plt.savefig(outputfig_filepath)

    memorySave(output_filepath)

def memorySave(output_filepath):
    timenow = datetime.datetime.now().strftime('%Y/%m/%d %H:%M:%S')
    mem = psutil.virtual_memory()
    used = mem.used
    percent = mem.percent
    row = [timenow, used, percent]

    if not os.path.exists(output_filepath):
        with open(output_filepath, 'w') as f_in:
            writer = csv.writer(f_in)
            header = ['Time', 'Used', 'PercentUsed']
            writer.writerow(header)
            writer.writerow(row)
    elif os.path.exists(output_filepath):
        with open(output_filepath, 'a') as f_in:
            writer = csv.writer(f_in)
            writer.writerow(row)

if __name__ == '__main__':
    fig = plt.figure()

    for i in range(num_graph):
        graphMake(i, output_filepath, data_range[0], data_range[1], data_num)
プログラムの解説に関しては、前回の記事をご覧ください。
ここからmultiprocessing、Threading、concurrentのThreadPoolExecutorとProcessPoolExecutorをそれぞれ導入したプログラムに感編していきます。
どのプログラムもそれぞれのライブラリのインポートと「if __name__ == ‘__main__’」の部分を修正していきます。
multiprocessingを使うように改変
まずはmultiprocessingを使うように改変していきます。
インポートは「from multiprocessing import Pool」です。
そして「if __name__ == ‘__main__’」の部分をこのように修正します。
if __name__ == '__main__':
    fig = plt.figure()

    with Pool(psutil.cpu_count()) as pool:
        args = []
        for i in range(num_graph):
            args.append([i, output_filepath, data_range[0], data_range[1], data_num])

        pool.starmap(graphMake, args)
「with Pool(psutil.cpu_count()) as pool:」の部分でCPUの数をPCの最大値に設定しています。
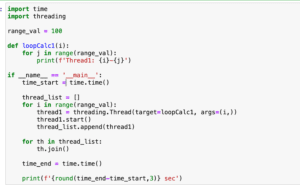
Threadingを使うように改変
次にThreadingですが、インポートは「import threading」です。
そして「if __name__ == ‘__main__’」の部分はこのように改変します。
if __name__ == '__main__':
    fig = plt.figure()

    for i in range(num_graph):
        thread = threading.Thread(target=graphMake, args=(i,output_filepath, data_range[0], data_range[1], data_num))
        thread.start()
concurrent ThreadPoolExecutorを使うように改変
次にconcurrentのThreadPoolExecutorを使うように改変してみましょう。
インポートは「from concurrent.futures import ThreadPoolExecutor」です。
そして「if __name__ == ‘__main__’」の部分はこのように改変します。
if __name__ == '__main__':
    fig = plt.figure()

    with ThreadPoolExecutor(max_workers=psutil.cpu_count()) as executor:
        for i in range(num_graph):
            executor.submit(graphMake, i,output_filepath, data_range[0], data_range[1], data_num)
concurrent ProcessPoolExecutorを使うように改変
最後にconcurrent ProcessPoolExecutorを使うように改変していきます。
インポートは「from concurrent.futures import ProcessPoolExecutor」です。
そして「if __name__ == ‘__main__’」の部分はこのように改変します。
if __name__ == '__main__':
    fig = plt.figure()

    with ProcessPoolExecutor(max_workers=psutil.cpu_count()) as executor:
        for i in range(num_graph):
            executor.submit(graphMake, i,output_filepath, data_range[0], data_range[1], data_num)
これでそれぞれのプログラムが完成したので、実行して比較してみましょう。
実行して、比較してみる
まずそれぞれのプログラムを実行したのですが、Threadingだけはなぜか途中で「OMP: Error #13: Assertion failure at kmp_runtime.cpp(3689).」というエラーが出てしまい、処理が最後まで行きつきませんでした。
調べてみたところ「OpenMP」という(多分)並列処理のプログラムにエラーが出ているようですが、対処法がよくわからなかったので、とりあえずは今回は脱落ということにしました。
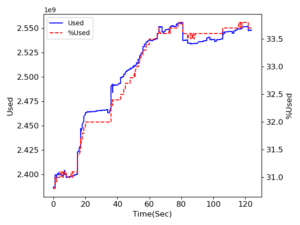
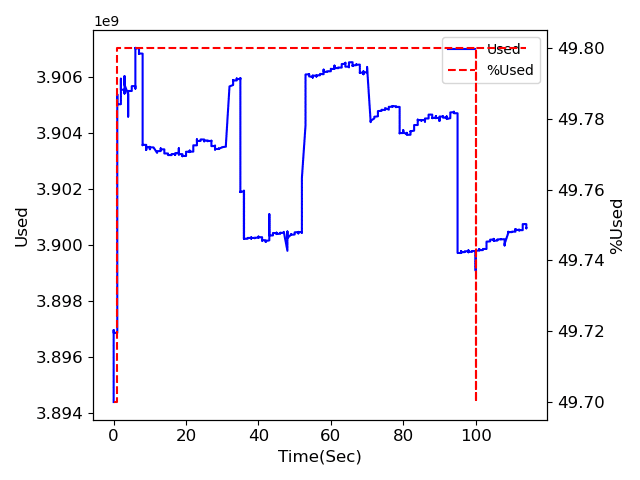
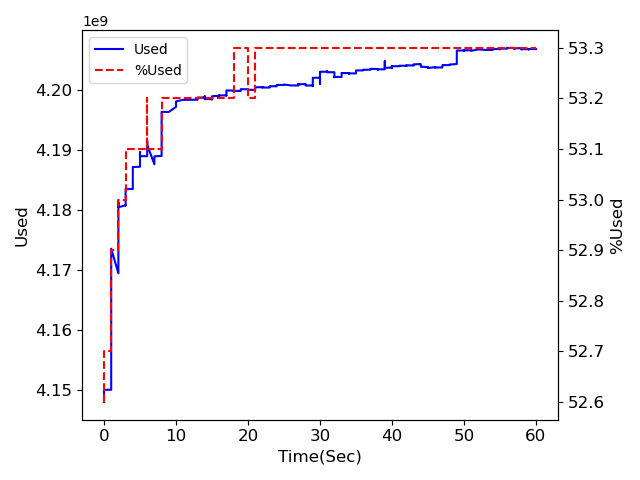
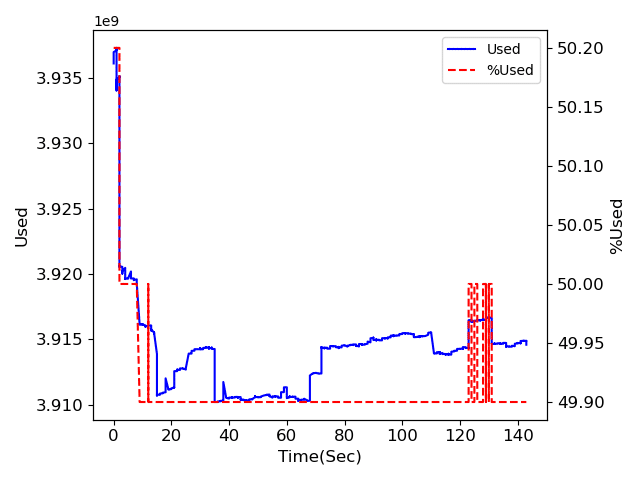
そして基本のプログラムを含め、4つのプログラムの実行結果はこんな感じです。
1.並列化処理なし
2.multiprocessing
3.concurrent ThreadPoolExecutor
4.concurrent ProcessPoolExecutor
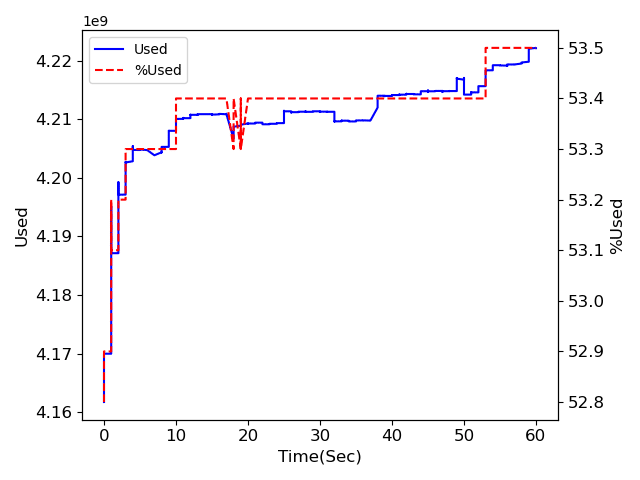
メモリ量に関しては前の対策が効いているようで、どれも大きく増加はしていません。
注目してもらいたいのは処理時間。
並列化処理なしの場合は120秒弱、multiprocessingとProcessPoolExecutorは60秒程度、ThreadPoolExecutorは140秒超。
多分ですが、マルチプロセスは使用するCPU数により処理が速くなっていて、マルチスレッドの場合はほとんど処理が速くなることはないのではないかと思われます。
もちろんそれも処理によってなのでしょうが、少なくとも今回のような大量の画像を出力するという処理に関してはCPUパワーを使うため、マルチプロセスの方が処理時間が短くなったのだと考えられます。
マルチスレッドの方が速くなる処理も探してみたいところですが、良い例が思いつかないので、すぐには厳しそうです。
ただconcurrentではThreadPoolExecutorとProcessPoolExecutorでちょっとだけ書き換えるだけでマルチスレッド、マルチプロセスを変えることができるので、これをメインで使って、両方試していくのがいいのではないでしょうか。
ということでこれでマルチスレッド、マルチプロセスに関しては一旦終了とします。
ではでは今回はこんな感じで。
コメント