Django
前回、単語の最小の文字数の設定をするためのフィールドを追加しました。
今回はワードクラウドアプリの目玉、マスクの設定をするためのフィールドを追加していきます。
マスクがどんなものかまだご存知ない方は、こちらの記事をどうぞ。
今回、修正するファイルはお馴染みのこちらの3つのファイル。
- /webapp/wordcloudapp/forms.py
- /webapp/wordcloudapp/views.py
- /webapp/wordcloudapp/templates/wordcloudapp/index.html
webapp
├── ...
└── wordcloudapp
    ├── __init__.py
    ├── admin.py
    ├── apps.py
    ├── forms.py                <-これ
    ├── migrations
    │   └── __init__.py
    ├── models.py
    ├── static
    │   └── wordcloudapp
    │       └── wordcloud.png
    ├── templates
    │   └── wordcloudapp
    │       └── index.html      <-これ
    ├── tests.py
    ├── urls.py
    └── views.py                <-これ
そしてマスクの設定として、以下の三つの設定を追加します。
- mask:マスク画像
- contour_width:マスク画像の枠線の太さ
- contour_color:マスク画像の枠線の色
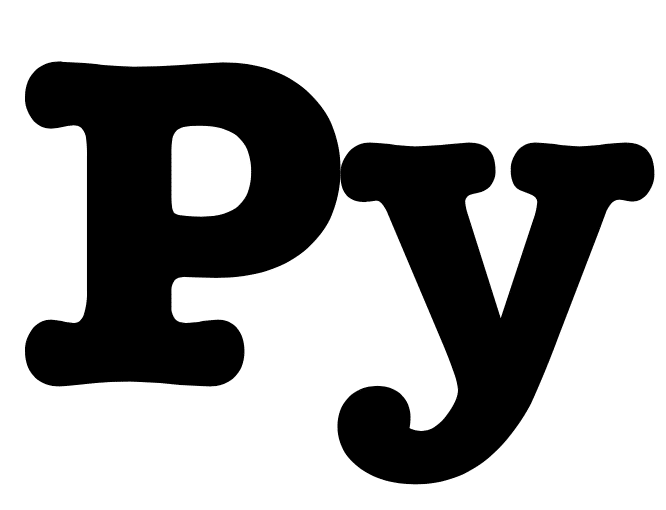
マスクの画像としては前にも使用したこちらの画像を使っていきます。
ちなみに今回の設定では、サーバー上にアップロードした画像が残らないような設定にしています。
Djangoを使っての初めてのファイルアップロードだったので、ファイルの取得方法は結構苦労しましたので、皆さんの参考になれば幸いです。
それでは始めていきましょう。
/webapp/wordcloudapp/forms.py
まずはforms.pyに「mask」、「contour_width」、「contour_color」のフォームを追加していきます。
from django import forms
from django.forms.widgets import CheckboxInput

bgcolor_list = [('White','白'),('Black','黒')]
textcolor_list = [('bwr','青-白-赤'),('hot','暖色系'),('cool','寒色系'),('Reds','赤'),('Blues','青'),('Greens','緑'),('Greys','白-黒'),('rainbow','虹色')]
pic_size_list = [(100,'100'),(200,'200'),(300,'300'),(400,'400'),(500,'500')]
mkline_color_list = [('Black','黒'),('Grey','灰色'),('White','白'),('Red','赤'),('Blue','青'),('Green','緑')]

class WordCloudForm(forms.Form):
    text = forms.CharField(label='テキスト')
    bgcolor_choice = forms.ChoiceField(widget=forms.RadioSelect, choices=bgcolor_list, initial='White')
    textcolor_choice = forms.ChoiceField(widget=forms.RadioSelect, choices=textcolor_list, initial='bwr')
    pic_size_height = forms.ChoiceField(widget=forms.Select, choices=pic_size_list, initial=300)
    pic_size_width = forms.ChoiceField(widget=forms.Select, choices=pic_size_list, initial=400)
    pic_transparence = forms.BooleanField(widget=CheckboxInput, required=False)
    min_word = forms.IntegerField(initial=0, min_value=0)
    mask_file = forms.ImageField(required=False)
    mask_line_width = forms.IntegerField(initial=0, min_value=0)
    mask_line_color = forms.ChoiceField(widget=forms.RadioSelect, choices=mkline_color_list, initial='White')
追加したのはマスク枠線用の色のリストmkline_color_listと最後の3行。
mkline_color_list = [('Black','黒'),('Grey','灰色'),('White','白'),('Red','赤'),('Blue','青'),('Green','緑')] mask_file = forms.ImageField(required=False)
mask_line_width = forms.IntegerField(initial=0, min_value=0)
mask_line_color = forms.ChoiceField(widget=forms.RadioSelect, choices=mkline_color_list, initial='White')マスク画像用に「mask_file」、マスク枠線の太さ用に「mask_line_width」、マスク枠線の色用に「mask_line_color」を設定しました。
これまでIntegerFieldとChoiceFieldは使ってきました。
今回新しく登場したのは、ImageFieldです。
これは画像ファイルをアップロードするためのフィールドで、アップロードされるファイルが画像かどうかも確認してくれるようです(多分)。
今回はマスクを使わない場合も考えられるので、「required=False」として必須項目ではなくしています。
/webapp/wordcloudapp/views.py
次にviews.pyを修正していきます。
from django.shortcuts import render
from django.http import HttpResponse
from .forms import WordCloudForm
import sys
sys.path.append('../')
from webapp import definitions
from janome.tokenizer import Tokenizer
from wordcloud import WordCloud
from PIL import Image
import numpy as np

def wordcloudmake(text, bgcolor, textcolor, height, width, transparence, min_word, mask_file, mask_line_width, mask_line_color):

    tk = Tokenizer(wakati=True)
    tokens = tk.tokenize(text)

    words = ' '.join(list(tokens))

    if transparence == 'on':
        bgcolor = None
        mode = 'RGBA'
    elif transparence == 'off':
        bgcolor = bgcolor
        mode = 'RGB'

    if mask_file == None:
        wordcloud = WordCloud(width=width, height=height, mode=mode, background_color=bgcolor, colormap=textcolor, min_word_length=min_word, font_path=r"/System/Library/Fonts/Hiragino Sans GB.ttc").generate(words)
    else:
        img = Image.open(mask_file)
        mask_img = np.array(img)
        wordcloud = WordCloud(width=width, height=height, mask=mask_img, contour_width=mask_line_width, contour_color=mask_line_color, mode=mode, background_color=bgcolor, colormap=textcolor, min_word_length=min_word, font_path=r"/System/Library/Fonts/Hiragino Sans GB.ttc").generate(words)

    wordcloud.to_file('./wordcloudapp/static/wordcloudapp/wordcloud.png')

def index(request):
    params = definitions.readjson()
    initial_val = {
        'text':'明日天気になぁれ',
        'bgcolor':'White',
        'textcolor':'bwr',
        'height':300,
        'width':400,
        'transparence':'off',
        'min_word':0,
        'mask_file':None,
        'mask_line_width':0,
        'mask_line_color':'White'
    }

    wordcloudmake(initial_val['text'], initial_val['bgcolor'], initial_val['textcolor'], initial_val['height'], initial_val['width'], initial_val['transparence'], initial_val['min_word'], initial_val['mask_file'], initial_val['mask_line_width'], initial_val['mask_line_color'])

    params['forms']= WordCloudForm(request.POST or None, initial=initial_val)

    if (request.method == 'POST'):
        text = str(request.POST['text'])
        bgcolor = str(request.POST['bgcolor_choice'])
        textcolor = str(request.POST['textcolor_choice'])
        height = int(request.POST['pic_size_height'])
        width = int(request.POST['pic_size_width'])
        if ('pic_transparence' in request.POST):
            transparence = 'on'
        else:
            transparence = 'off'
        min_word = int(request.POST['min_word'])

        mask_file = request.FILES.get('mask_file')
        mask_line_width = int(request.POST['mask_line_width'])
        mask_line_color = str(request.POST['mask_line_color'])

        wordcloudmake(text, bgcolor, textcolor, height, width, transparence, min_word, mask_file, mask_line_width, mask_line_color)

        params['forms'] = WordCloudForm(request.POST)

    return render(request, 'wordcloudapp/index.html', params)
今回は上から順番に解説していきましょう。
import
マスクの画像を扱うので、PIL(Python Image Library、Pillow)をインポートします。
また画像をndarrayに変換するため、numpyをインポートします。
from PIL import Image
import numpy as np
ちなみにPILはこちらの記事で解説していますので、よかったらどうぞ。

def wordcloudmake
次に「wordcloudmake」を修正します。
まずはマスク用の引数を追加。
def wordcloudmake(text, bgcolor, textcolor, height, width, transparence, min_word, mask_file, mask_line_width, mask_line_color):今回重要なのはワードクラウドの作成部分、つまりWordCloudを使っているこの部分です。
if mask_file == None:
        wordcloud = WordCloud(width=width, height=height, mode=mode, background_color=bgcolor, colormap=textcolor, min_word_length=min_word, font_path=r"/System/Library/Fonts/Hiragino Sans GB.ttc").generate(words)
    else:
        img = Image.open(mask_file)
        mask_img = np.array(img)
        wordcloud = WordCloud(width=width, height=height, mask=mask_img, contour_width=mask_line_width, contour_color=mask_line_color, mode=mode, background_color=bgcolor, colormap=textcolor, min_word_length=min_word, font_path=r"/System/Library/Fonts/Hiragino Sans GB.ttc").generate(words)
マスクを使う使わないでWordCloudの引数が変わってくるので、if文を使って条件分岐させています。
マスクを使わない場合はこれまでと同じですが、使う場合にはPILで画像を読み込み、numpyでndarraynに変換し、WordCloudの引数に「mask」、「contour_width」、「contour_color」を追加します。
def index(request):(if (request.method == ‘POST’):以前)
次にdef index(request):のif (request.method == ‘POST’):以前、つまりページが最初に表示された時の動作の部分です。
まずinitial_valに「mask_file」、「mask_line_width」、「mask_line_color」の初期値を追加します。
    initial_val = {
        'text':'明日天気になぁれ',
        'bgcolor':'White',
        'textcolor':'bwr',
        'height':300,
        'width':400,
        'transparence':'off',
        'min_word':0,
        'mask_file':None,
        'mask_line_width':0,
        'mask_line_color':'White'
    }
そしてwordcloudmakeの引数に「mask_file」「mask_line_width」「mask_line_color」を追加します。
wordcloudmake(initial_val['text'], initial_val['bgcolor'], initial_val['textcolor'], initial_val['height'], initial_val['width'], initial_val['transparence'], initial_val['min_word'], initial_val['mask_file'], initial_val['mask_line_width'], initial_val['mask_line_color'])def index(request):(if (request.method == ‘POST’):以降)
次に情報が送信された後(if (request.method == ‘POST’):以降)の動作の部分を修正していきます。
まずは送信された「mask_file」、「mask_line_width」、「mask_line_color」の情報を取得します、
        mask_file = request.FILES.get('mask_file')
        mask_line_width = int(request.POST['mask_line_width'])
        mask_line_color = str(request.POST['mask_line_color'])
ここで気をつけることは「mask_file」、つまりマスク用画像のファイルを取得するには、「request.POST[‘mask_file’]」ではなく、「request.FILES.get(‘mask_file’)」とします。
あとはwordcloudmakeの引数に「mask_file」「mask_line_width」「mask_line_color」を追加します。
wordcloudmake(text, bgcolor, textcolor, height, width, transparence, min_word, mask_file, mask_line_width, mask_line_color)/webapp/wordcloudapp/templates/wordcloudapp/index.html
次にindex.htmlを修正していきます。
{% extends "basetemplates/base.html" %}

{% block title %}
<title>{{ title }}|ワードクラウド</title>
{% endblock %}

{% block content %}
    <form action="/wordcloudapp/" method="post" enctype="multipart/form-data">
        {% csrf_token %}
        <p style="text-align: center;"><font size="5">テキスト:  </font>{{ forms.text }}</p>
        <div class="row">
            <div class="col" style="text-align: left;"></div>
            <div class="col" style="text-align: left;"><font size="5">高さ:  </font>{{ forms.pic_size_height }}<font size="5">  px</font></div>
            <div class="col" style="text-align: left;"><font size="5">幅:  </font>{{ forms.pic_size_width }}<font size="5">  px</font></div>
            <div class="col" style="text-align: left;"></div>
        </div>
        <p style="margin:1rem 0rem 0rem 0rem;"></p>
        <div class="row">
            <div class="col" style="text-align: left;"></div>
            <div class="col" style="text-align: left;">
                <font size="5">背景色</font>
                <p style="margin:0.5rem 0rem 0rem 0rem;"></p>
                {{ forms.bgcolor_choice }}
                <font size="5">背景透明化:</font>{{ forms.pic_transparence }}
                <p style="margin:2rem 0rem 0rem 0rem;"></p>
                <font size="5">単語の最小の文字数:</font>{{ forms.min_word }}
            </div>
            <div class="col" style="text-align: left;">
                <font size="5">テキスト色</font>
                <p style="margin:0.5rem 0rem 0rem 0rem;"></p>
                {{ forms.textcolor_choice }}
            </div>
            <div class="col" style="text-align: left;">
                <font size="5">マスク用画像:</font><input type="file" name="mask_file">
                <font size="5">マスク線幅:</font>{{ forms.mask_line_width }}
                <p style="margin:0.5rem 0rem 0rem 0rem;"></p>
                <font size="5">マスク線色:</font>{{ forms.mask_line_color }}
            </div>
        </div>
        <p style="text-align: center;"><input type='submit' value="click"></p>
    </form>
    <p style="text-align: center;"><img src="/static/wordcloudapp/wordcloud.png"></p>
    <p style="margin:2rem 0rem 0rem 0rem;"></p>
{% endblock %}
ここでまず今までと違うのはformタグです。
これまでは「<form action=”/wordcloudapp/” method=”post”>」でしたが、ここに「enctype=”multipart/form-data”」を追加します。
<form action="/wordcloudapp/" method="post" enctype="multipart/form-data">これは送信するデータの形式を指定するもので、ファイルを送る場合には「enctype=”multipart/form-data”」とするものらしいです。
またテキストファイルの場合は「text/plain」とする、そして指定をしない場合は「application/x-www-form-urlencoded」(これが何を意味しているのか分かりませんが…)となるようです。
次にマスク用のフォーム「mask_file」「mask_line_width」「mask_line_color」を追加していきますが、「mask_file」はこれまでと違った形で挿入します。
<input type="file" name="mask_file">これはHTMLのファイルアップロードの書き方のようです。
ということで今回追加した部分はこんな感じになりました。
                <font size="5">マスク用画像:</font><input type="file" name="mask_file">
                <font size="5">マスク線幅:</font>{{ forms.mask_line_width }}
                <p style="margin:0.5rem 0rem 0rem 0rem;"></p>
                <font size="5">マスク線色:</font>{{ forms.mask_line_color }}
これでサーバーを起動し、表示を確認してみましょう。
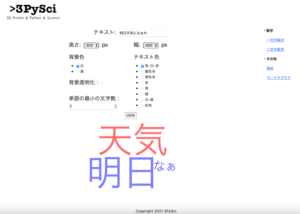
アクセスした画面はこんな感じ。

「マスク用画像」、「マスク線幅」、「マスク線色」が追加されています。
マスク用画像をアップロードし、マスク線幅を「5」、マスク線色を「黒」にして実行してみます。
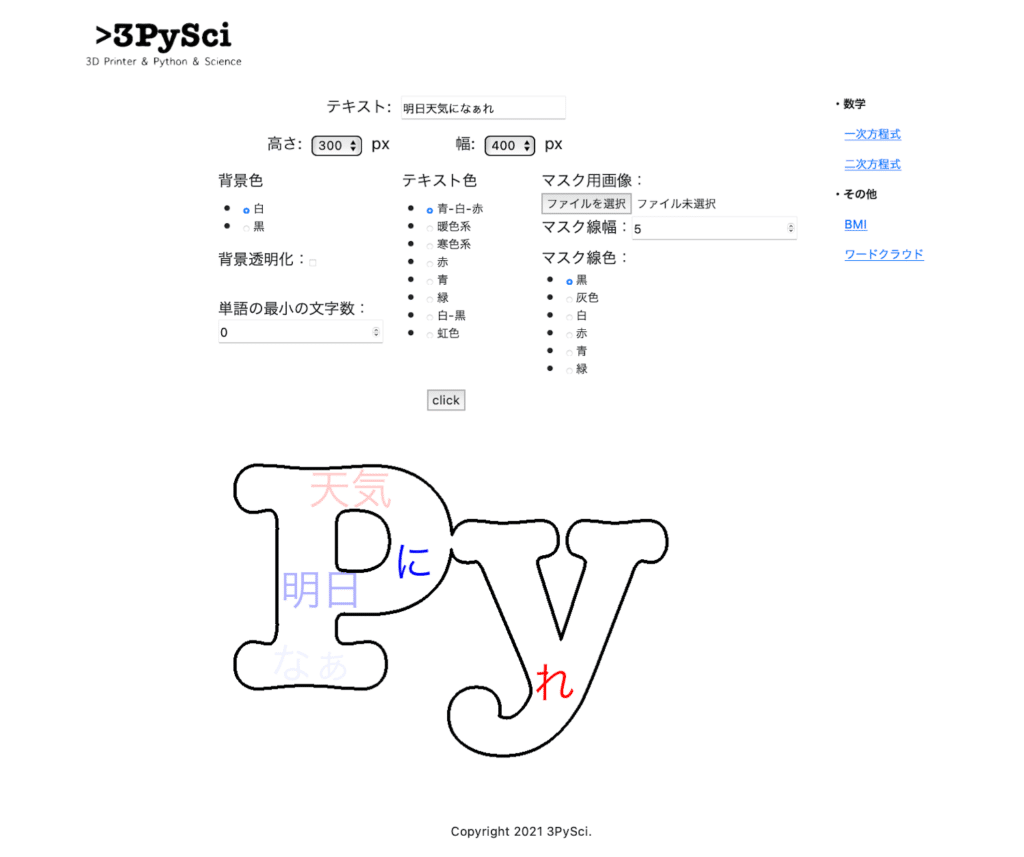
確かにマスクを使ったワードクラウドになりました。
次回はこれまでテキストのフォームを使ってきましたが、実際にワードクラウドを作る、特に「映えるワードクラウド」にするには全然文字が足りません。
ということで次回はテキストファイルをアップロードして、ワードクラウドを作成できるように修正していきましょう。
ではでは今回はこんな感じで。
コメント