Open Weather Map
前回、Open Weather MapをJupyter notebook上で試してみました。
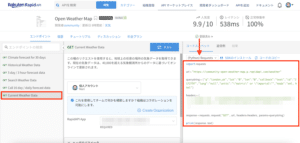
前回作成したプログラムをまとめてみるとこんな感じです。
import requests

url = "https://community-open-weather-map.p.rapidapi.com/weather"

querystring = {"q":"Tokyo, jp","lat":"0","lon":"0","callback":"test","id":"2172797","lang":"null","units":"\"metric\" or \"imperial\"","mode":"xml, html"}

headers = {
    'x-rapidapi-key': " Your API key",
    'x-rapidapi-host': "community-open-weather-map.p.rapidapi.com"
    }

response = requests.request("GET", url, headers=headers, params=querystring)
import json
data = json.loads(response.text)
print(data['weather'][0]['main'])これでクエリーで送信した都市の現在の天気を取得することができます。
今回はこのプログラムとtweepy(Twitter API)を介してつぶやくというプログラムを作成してみたいと思います。
ちなみにtweepyで初めてツイートしたときの記事はこちらですので、よかったらどうぞ。

プログラム全体
まずはプログラム全体です。
import tweepy
from datetime import date
import requests
import json

timenow = date.today()

#For OpenWeatherMap
weather_points = [{"q":"Sapporo, jp"}, {"q":"Tokyo, jp"}, {"q":"Nagoya, jp"}, {"q":"Osaka, jp"}, {"q":"Fukuoka, jp"}]

url = "https://community-open-weather-map.p.rapidapi.com/weather"

headers = {
'x-rapidapi-key': " Rakuten Rapid API key ",
'x-rapidapi-host': "community-open-weather-map.p.rapidapi.com"
}

#For TwitterAPI
consumer_key = ' consumer key '
consumer_secret = ' consumer secret '
access_token = ' access token '
access_token_secret = ' access token secret '

def weatherget(url, headers, weather_points):
    weather_list = []
    for point in weather_points:
        weather_data = requests.request("GET", url, headers=headers, params=point)
        weather_json = json.loads(weather_data.text)
        weather_list.append(weather_json['weather'][0]['main'])

    return weather_list

def applytweet(consumer_key, consumer_secret, access_token, access_token_secret, weather_list):
    auth = tweepy.OAuthHandler(consumer_key, consumer_secret)
    auth.set_access_token(access_token, access_token_secret)

    api = tweepy.API(auth, wait_on_rate_limit = True)

    api.update_status(
        f"おはようございます😆\n\n\
        現在の各地の天気は...\n\
        札幌 : {weather_list[0]}\n\
        東京 : {weather_list[1]}\n\
        名古屋: {weather_list[2]}\n\
        大阪 : {weather_list[3]}\n\
        福岡 : {weather_list[4]}\n\n\
        今日も1日頑張っていきましょう👍\n\n\
        #Python\n\
        #プログラミング\n\
        #エンジニアと繋がりたい")

def main():
    weather_list = weatherget(url, headers, weather_points)
    applytweet(consumer_key, consumer_secret, access_token, access_token_secret, weather_list)
if __name__ == '__main__':
    main()
それでは一つずつ見ていきましょう。
ライブラリ、モジュールのインポート
まずはインポートするライブラリ、モジュールの確認です。
import tweepy
from datetime import date
import requests
import json
Twitterでつぶやくために「tweepy」、年月日を取得するため「dateモジュール(datetime)」、OpenWeatherMapからデータを取得するための「requests」、データを整形するための「json」です。
セッティング
次にセッティングです。
timenow = date.today()

#For OpenWeatherMap
weather_points = [{"q":"Sapporo, jp"}, {"q":"Tokyo, jp"}, {"q":"Nagoya, jp"}, {"q":"Osaka, jp"}, {"q":"Fukuoka, jp"}]

url = "https://community-open-weather-map.p.rapidapi.com/weather"

headers = {
'x-rapidapi-key': " Rakuten Rapid API key ",
'x-rapidapi-host': "community-open-weather-map.p.rapidapi.com"
}

#For TwitterAPI
consumer_key = ' consumer key '
consumer_secret = ' consumer secret '
access_token = ' access token '
access_token_secret = ' access token secret '
まず一番最初に現在の年月日を取得しています。
timenow = date.today()Open Weather Mapのためのセッティングです。
#For OpenWeatherMap
weather_points = [{"q":"Sapporo, jp"}, {"q":"Tokyo, jp"}, {"q":"Nagoya, jp"}, {"q":"Osaka, jp"}, {"q":"Fukuoka, jp"}]

url = "https://community-open-weather-map.p.rapidapi.com/weather"

headers = {
'x-rapidapi-key': " Rakuten Rapid API key ",
'x-rapidapi-host': "community-open-weather-map.p.rapidapi.com"
}
url以下は前回からそのままです。
変えたのはクエリの部分です。
札幌、東京、名古屋、大阪、福岡をクエリとして設定し、それをリストweather_pointsに格納しています。
weather_points = [{"q":"Sapporo, jp"}, {"q":"Tokyo, jp"}, {"q":"Nagoya, jp"}, {"q":"Osaka, jp"}, {"q":"Fukuoka, jp"}]
次にTwitter API用のセッティングです。
#For TwitterAPI
consumer_key = ' consumer key '
consumer_secret = ' consumer secret '
access_token = ' access token '
access_token_secret = ' access token secret '
consumer key、consumer secret、access token、access token secretのキーを後で使いやすいようにそれぞれ変数に格納しています。
weatherget関数
Open Weather MAPからデータを取得するための関数です。
今回は複数の地点からデータを取得したいため、クエリーをまとめたリストを入力するとfor文を使って各地点のデータを順々に取得し、リストweather_listに格納し、最終的にweather_listを返します。
def weatherget(url, headers, weather_points):
    weather_list = []
    for point in weather_points:
        weather_data = requests.request("GET", url, headers=headers, params=point)
        weather_json = json.loads(weather_data.text)
        weather_list.append(weather_json['weather'][0]['main'])

    return weather_list
applytweet関数
applytweet関数はtweepyを使って、ツイートする関数です。
def applytweet(consumer_key, consumer_secret, access_token, access_token_secret, weather_list):
    auth = tweepy.OAuthHandler(consumer_key, consumer_secret)
    auth.set_access_token(access_token, access_token_secret)

    api = tweepy.API(auth, wait_on_rate_limit = True)

    api.update_status(
        f"おはようございます😆\n\n\
        現在の各地の天気は...\n\
        札幌 : {weather_list[0]}\n\
        東京 : {weather_list[1]}\n\
        名古屋: {weather_list[2]}\n\
        大阪 : {weather_list[3]}\n\
        福岡 : {weather_list[4]}\n\n\
        今日も1日頑張っていきましょう👍\n\n\
        #Python\n\
        #プログラミング\n\
        #エンジニアと繋がりたい")
まずこちらの部分でTwitter APIに接続しています。
    auth = tweepy.OAuthHandler(consumer_key, consumer_secret)
    auth.set_access_token(access_token, access_token_secret)

    api = tweepy.API(auth, wait_on_rate_limit = True)
そして「api.update_status()」でツイートするという流れです。
api.update_status(
        f"おはようございます😆\n\n\
        現在の各地の天気は...\n\
        札幌 : {weather_list[0]}\n\
        東京 : {weather_list[1]}\n\
        名古屋: {weather_list[2]}\n\
        大阪 : {weather_list[3]}\n\
        福岡 : {weather_list[4]}\n\n\
        今日も1日頑張っていきましょう👍\n\n\
        #Python\n\
        #プログラミング\n\
        #エンジニアと繋がりたい")
これで実行してみたのがこちら。
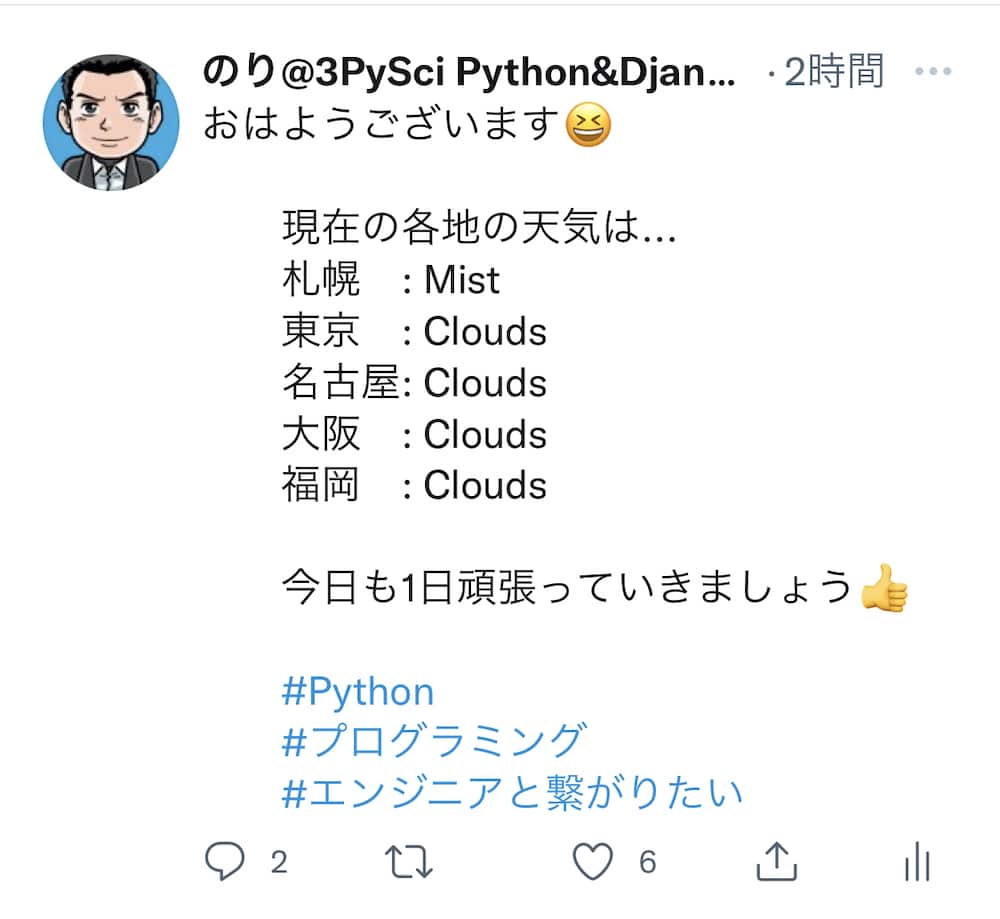
天気が英語なので、そのうち絵文字に変えたいなと思っています。
ただどんな天気があるのか、よく分からないので、とりあえずこれで運用して、表示を確認していくことにしました。
ということでとりあえず天気をツイートするプログラムは完成です。
ではでは今回はこんな感じで。
コメント