X軸、Y軸の範囲を指定
前にX軸、Y軸それぞれ、もしくはともに2本の2軸グラフの作成方法を解説しました。
そこで忘れていたこと。
それは2軸グラフの場合、どうやってそれぞれの軸での表示範囲の指定するのかということです。
拡大は前に解説したマジックコマンドを使うとマウスを使って動的に範囲を指定し拡大することができます。

しかしマウスで範囲を指定するとなると、正確な範囲を指定したり、複数のグラフで全く同じ範囲のグラフを作成するのは困難です。
通常の1軸グラフであれば、xlim(a, b)、やylim(a, b) で表示範囲を指定することができます(aは最小値、bは最大値)。
では2軸グラフになった場合はどの様に範囲を指定するのでしょうか?
ということで今回は2軸グラフの場合のX軸、Y軸の範囲の指定方法を解説していきます。
前回のおさらい
まずは前回のプログラムのおさらいをしてみましょう。
from matplotlib import pyplot as plt

x1 = ["1", "2", "3", "4", "5", "6", "7", "8", "9", "10"]
y1 = [1, 2, 3, 4, 5, 6, 7, 8, 9, 10]
x2 = ["a", "b", "c", "d", "e", "f", "g", "h", "i", "j"]
y2 = [2, 4, 8, 16, 32, 64, 128, 256, 512, 1024]

fig = plt.figure()

ax1 = fig.subplots()
ax2 = ax1.twiny()
ax3 = ax2.twinx()

ax1.plot(x1, y1, color="blue", label="x1y1")
ax3.plot(x2, y2, c="r", label="x2y2")

ax1.set_xlabel("x1-axis", fontsize=15)
ax1.set_ylabel("y1-axis", fontsize=15)
ax2.set_xlabel("x2-axis", fontsize=15)
ax3.set_ylabel("y2-axis", fontsize=15)

ax1.tick_params(labelsize=15)
ax2.tick_params(labelsize=15)
ax3.tick_params(labelsize=15)

h1, l1 = ax1.get_legend_handles_labels()
h3, l3 = ax3.get_legend_handles_labels()
ax1.legend(h1 + h3, l1 + l3)

plt.show()

実行結果
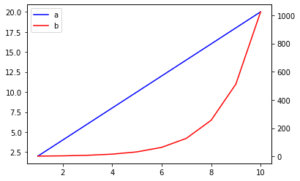
データのXはx1、x2の2つ、またYはy1、y2の2つ。
x1 = ["1", "2", "3", "4", "5", "6", "7", "8", "9", "10"]
y1 = [1, 2, 3, 4, 5, 6, 7, 8, 9, 10]
x2 = ["a", "b", "c", "d", "e", "f", "g", "h", "i", "j"]
y2 = [2, 4, 8, 16, 32, 64, 128, 256, 512, 1024]
そして、データはax1にx1とy1の組み合わせで、ax3にx2、y2の組み合わせでプロットされています。
ax1.plot(x1, y1, color="blue", label="x1y1")
ax3.plot(x2, y2, c="r", label="x2y2")
このプロットしているグラフを意識して、表示範囲を制限していきます。
set_xlim、set_ylim
2軸グラフでX軸の表示範囲を指定する場合はset_xlim(最小値, 最大値)とします。
またY軸の表示範囲を指定する場合は、set_ylim(最小値, 最大値)とします。
とりあえずこんな感じで指定してみます。
ax1.set_xlim(2,5)
ax1.set_ylim(3,7)
プログラム全体はこんな感じ。
from matplotlib import pyplot as plt

x1 = ["1", "2", "3", "4", "5", "6", "7", "8", "9", "10"]
y1 = [1, 2, 3, 4, 5, 6, 7, 8, 9, 10]
x2 = ["a", "b", "c", "d", "e", "f", "g", "h", "i", "j"]
y2 = [2, 4, 8, 16, 32, 64, 128, 256, 512, 1024]

fig = plt.figure()

ax1 = fig.subplots()
ax2 = ax1.twiny()
ax3 = ax2.twinx()

ax1.plot(x1, y1, color="blue", label="x1y1")
ax3.plot(x2, y2, c="r", label="x2y2")

ax1.set_xlabel("x1-axis", fontsize=15)
ax1.set_ylabel("y1-axis", fontsize=15)
ax2.set_xlabel("x2-axis", fontsize=15)
ax3.set_ylabel("y2-axis", fontsize=15)

ax1.tick_params(labelsize=15)
ax2.tick_params(labelsize=15)
ax3.tick_params(labelsize=15)

ax1.set_xlim(2,5)
ax1.set_ylim(3,7)

h1, l1 = ax1.get_legend_handles_labels()
h3, l3 = ax3.get_legend_handles_labels()
ax1.legend(h1 + h3, l1 + l3)

plt.show()

実行結果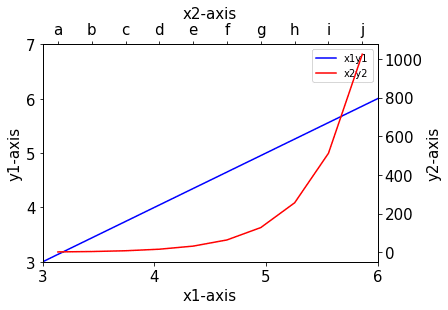
表示範囲が制限されましたが、X軸の範囲を(2, 5)と指定したのに、3から6になっています。
これはx1のリストの数字がint型ではなく、str型となっているため、インデックスとして2である”3″からインデックスとして5である”6″までの範囲となってしまっています。
(リストを指定するインデックスは0, 1, 2…というように0から始まります)
x1のリストをint型としての数字に変えてみましょう。
from matplotlib import pyplot as plt

x1 = [1, 2, 3, 4, 5, 6, 7, 8, 9, 10]
y1 = [1, 2, 3, 4, 5, 6, 7, 8, 9, 10]
x2 = ["a", "b", "c", "d", "e", "f", "g", "h", "i", "j"]
y2 = [2, 4, 8, 16, 32, 64, 128, 256, 512, 1024]

fig = plt.figure()

ax1 = fig.subplots()
ax2 = ax1.twiny()
ax3 = ax2.twinx()

ax1.plot(x1, y1, color="blue", label="x1y1")
ax3.plot(x2, y2, c="r", label="x2y2")

ax1.set_xlabel("x1-axis", fontsize=15)
ax1.set_ylabel("y1-axis", fontsize=15)
ax2.set_xlabel("x2-axis", fontsize=15)
ax3.set_ylabel("y2-axis", fontsize=15)

ax1.tick_params(labelsize=15)
ax2.tick_params(labelsize=15)
ax3.tick_params(labelsize=15)

ax1.set_xlim(2,5)
ax1.set_ylim(3,7)

h1, l1 = ax1.get_legend_handles_labels()
h3, l3 = ax3.get_legend_handles_labels()
ax1.legend(h1 + h3, l1 + l3)

plt.show()

実行結果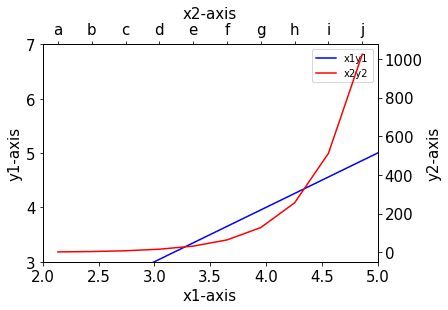
今度はX軸の表示範囲が2から5の範囲になりました。
このset_xlim、set_ylimをもう一つのグラフであるax3で行うとax3のグラフの範囲を指定できます。
from matplotlib import pyplot as plt
x1 = [1, 2, 3, 4, 5, 6, 7, 8, 9, 10]
y1 = [1, 2, 3, 4, 5, 6, 7, 8, 9, 10]
x2 = ["a", "b", "c", "d", "e", "f", "g", "h", "i", "j"]
y2 = [2, 4, 8, 16, 32, 64, 128, 256, 512, 1024]
fig = plt.figure()
ax1 = fig.subplots()
ax2 = ax1.twiny()
ax3 = ax2.twinx()
ax1.plot(x1, y1, color="blue", label="x1y1")
ax3.plot(x2, y2, c="r", label="x2y2")
ax1.set_xlabel("x1-axis", fontsize=15)
ax1.set_ylabel("y1-axis", fontsize=15)
ax2.set_xlabel("x2-axis", fontsize=15)
ax3.set_ylabel("y2-axis", fontsize=15)
ax1.tick_params(labelsize=15)
ax2.tick_params(labelsize=15)
ax3.tick_params(labelsize=15)
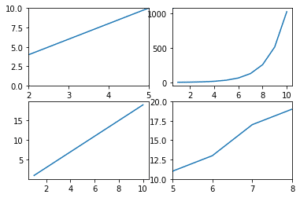
ax1.set_xlim(2,5)
ax1.set_ylim(3,7)
ax3.set_xlim(1,3)
ax3.set_ylim(0,10)
h1, l1 = ax1.get_legend_handles_labels()
h3, l3 = ax3.get_legend_handles_labels()
ax1.legend(h1 + h3, l1 + l3)
plt.show()
実行結果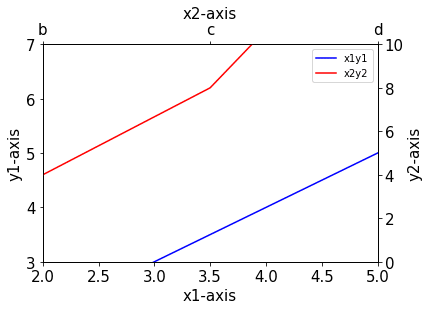
2軸目も表示範囲をしていできました。
前に使ったxlim、ylimは使えないのか?
普通のグラフの場合、X軸、Y軸の表示範囲を指定するのにxlim(最小値, 最大値)、ylim(最小値, 最大値)を使いました。
2軸グラフではこのコマンドは使えないのでしょうか?
試してみましょう。
from matplotlib import pyplot as plt

x1 = [1, 2, 3, 4, 5, 6, 7, 8, 9, 10]
y1 = [1, 2, 3, 4, 5, 6, 7, 8, 9, 10]
x2 = ["a", "b", "c", "d", "e", "f", "g", "h", "i", "j"]
y2 = [2, 4, 8, 16, 32, 64, 128, 256, 512, 1024]

fig = plt.figure()

ax1 = fig.subplots()
ax2 = ax1.twiny()
ax3 = ax2.twinx()

ax1.plot(x1, y1, color="blue", label="x1y1")
ax3.plot(x2, y2, c="r", label="x2y2")

ax1.set_xlabel("x1-axis", fontsize=15)
ax1.set_ylabel("y1-axis", fontsize=15)
ax2.set_xlabel("x2-axis", fontsize=15)
ax3.set_ylabel("y2-axis", fontsize=15)

ax1.tick_params(labelsize=15)
ax2.tick_params(labelsize=15)
ax3.tick_params(labelsize=15)

ax1.xlim(2,5)

h1, l1 = ax1.get_legend_handles_labels()
h3, l3 = ax3.get_legend_handles_labels()
ax1.legend(h1 + h3, l1 + l3)

plt.show()

実行結果
---------------------------------------------------------------------------
AttributeError                            Traceback (most recent call last)
<ipython-input-16-daaa90cdc6e5> in <module>
     24 ax3.tick_params(labelsize=15)
     25
---> 26 ax1.xlim(2,5)
     27
     28 h1, l1 = ax1.get_legend_handles_labels()

AttributeError: 'AxesSubplot' object has no attribute 'xlim'
やっぱりダメでした。
今回は2軸グラフでX軸、Y軸の表示範囲を変える方法を解説しました。
綺麗なグラフを作成するには必須のコマンドなので、是非とも覚えておきたいものです。
次回は複数のグラフに対して、それぞれのX軸、Y軸の表示範囲を変える方法を解説していきます。
ということで今回はこんな感じで。
コメント