WordCloud
前回、形態素解析ライブラリjanomeを色々試して、使い方を勉強してみました。
今回はワードクラウド作成ライブラリWodCloudを色々試して、勉強していきたいと思います。
まずはjanomeで形態素解析をしなければいけないので、その基本形はこちら。
from janome.tokenizer import Tokenizer

data = "今日は天気でした。明日天気になぁれ。明後日も天気になぁれ。"

tk = Tokenizer(wakati=True)
tokens = tk.tokenize(data)

words = " ".join(list(tokens))

print(words)

実行結果
今日 は 天気 でし た 。 明日 天気 に なぁ れ 。 明後日 も 天気 に なぁ れ 。
これで現在、リストwordsに文章が分かち書きされた文が格納されました。
次にできるだけデフォルト状態でWordCloudを実行してみましょう。
from wordcloud import WordCloud
wordcloud = WordCloud(font_path=r"/System/Library/Fonts/Hiragino Sans GB.ttc").generate(words)
wordcloud.to_file("./sample.png")
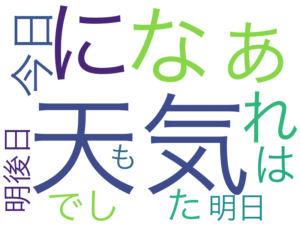
実行結果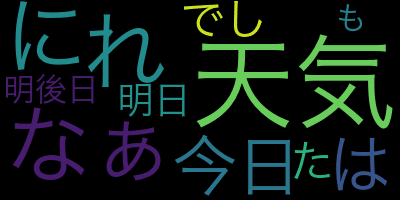
フォントだけは指定しないと文字化けしてしまうので、フォントは指定しました。
他はこの状態がデフォルトです。
それでは始めていきましょう。
WordCloudのヘルプを確認
まずはWordCloudのヘルプを見て、何を変更できるのか確認していきましょう。
from wordcloud import WordCloud

help(WordCloud)

実行結果
Help on class WordCloud in module wordcloud.wordcloud:

class WordCloud(builtins.object)
 |  WordCloud(font_path=None, width=400, height=200, margin=2, ranks_only=None, prefer_horizontal=0.9, mask=None, scale=1, color_func=None, max_words=200, min_font_size=4, stopwords=None, random_state=None, background_color='black', max_font_size=None, font_step=1, mode='RGB', relative_scaling='auto', regexp=None, collocations=True, colormap=None, normalize_plurals=True, contour_width=0, contour_color='black', repeat=False, include_numbers=False, min_word_length=0, collocation_threshold=30)
 |
 |  Word cloud object for generating and drawing.
 |
 |  Parameters
 |  ----------
 |  font_path : string
 |      Font path to the font that will be used (OTF or TTF).
 |      Defaults to DroidSansMono path on a Linux machine. If you are on
 |      another OS or don't have this font, you need to adjust this path.
 |
 |  width : int (default=400)
 |      Width of the canvas.
 |
 |  height : int (default=200)
 |      Height of the canvas.
 |
 |  prefer_horizontal : float (default=0.90)
 |      The ratio of times to try horizontal fitting as opposed to vertical.
 |      If prefer_horizontal < 1, the algorithm will try rotating the word
 |      if it doesn't fit. (There is currently no built-in way to get only
 |      vertical words.)
 |
 |  mask : nd-array or None (default=None)
 |      If not None, gives a binary mask on where to draw words. If mask is not
 |      None, width and height will be ignored and the shape of mask will be
 |      used instead. All white (#FF or #FFFFFF) entries will be considerd
 |      "masked out" while other entries will be free to draw on. [This
 |      changed in the most recent version!]
 |
 |  contour_width: float (default=0)
 |      If mask is not None and contour_width > 0, draw the mask contour.
 |
 |  contour_color: color value (default="black")
 |      Mask contour color.
 |
 |  scale : float (default=1)
 |      Scaling between computation and drawing. For large word-cloud images,
 |      using scale instead of larger canvas size is significantly faster, but
 |      might lead to a coarser fit for the words.
 |
 |  min_font_size : int (default=4)
 |      Smallest font size to use. Will stop when there is no more room in this
 |      size.
 |
 |  font_step : int (default=1)
 |      Step size for the font. font_step > 1 might speed up computation but
 |      give a worse fit.
 |
 |  max_words : number (default=200)
 |      The maximum number of words.
 |
 |  stopwords : set of strings or None
 |      The words that will be eliminated. If None, the build-in STOPWORDS
 |      list will be used. Ignored if using generate_from_frequencies.
 |
 |  background_color : color value (default="black")
 |      Background color for the word cloud image.
 |
 |  max_font_size : int or None (default=None)
 |      Maximum font size for the largest word. If None, height of the image is
 |      used.
 |
 |  mode : string (default="RGB")
 |      Transparent background will be generated when mode is "RGBA" and
 |      background_color is None.
 |
 |  relative_scaling : float (default='auto')
 |      Importance of relative word frequencies for font-size.  With
 |      relative_scaling=0, only word-ranks are considered.  With
 |      relative_scaling=1, a word that is twice as frequent will have twice
 |      the size.  If you want to consider the word frequencies and not only
 |      their rank, relative_scaling around .5 often looks good.
 |      If 'auto' it will be set to 0.5 unless repeat is true, in which
 |      case it will be set to 0.
 |
 |      .. versionchanged: 2.0
 |          Default is now 'auto'.
 |
 |  color_func : callable, default=None
 |      Callable with parameters word, font_size, position, orientation,
 |      font_path, random_state that returns a PIL color for each word.
 |      Overwrites "colormap".
 |      See colormap for specifying a matplotlib colormap instead.
 |      To create a word cloud with a single color, use
 |      ``color_func=lambda *args, **kwargs: "white"``.
 |      The single color can also be specified using RGB code. For example
 |      ``color_func=lambda *args, **kwargs: (255,0,0)`` sets color to red.
 |
 |  regexp : string or None (optional)
 |      Regular expression to split the input text into tokens in process_text.
 |      If None is specified, ``r"\w[\w']+"`` is used. Ignored if using
 |      generate_from_frequencies.
 |
 |  collocations : bool, default=True
 |      Whether to include collocations (bigrams) of two words. Ignored if using
 |      generate_from_frequencies.
 |
 |
 |      .. versionadded: 2.0
 |
 |  colormap : string or matplotlib colormap, default="viridis"
 |      Matplotlib colormap to randomly draw colors from for each word.
 |      Ignored if "color_func" is specified.
 |
 |      .. versionadded: 2.0
 |
 |  normalize_plurals : bool, default=True
 |      Whether to remove trailing 's' from words. If True and a word
 |      appears with and without a trailing 's', the one with trailing 's'
 |      is removed and its counts are added to the version without
 |      trailing 's' -- unless the word ends with 'ss'. Ignored if using
 |      generate_from_frequencies.
 |
 |  repeat : bool, default=False
 |      Whether to repeat words and phrases until max_words or min_font_size
 |      is reached.
 |
 |  include_numbers : bool, default=False
 |      Whether to include numbers as phrases or not.
 |
 |  min_word_length : int, default=0
 |      Minimum number of letters a word must have to be included.
 |
 |  collocation_threshold: int, default=30
 |      Bigrams must have a Dunning likelihood collocation score greater than this
 |      parameter to be counted as bigrams. Default of 30 is arbitrary.
 |
 |      See Manning, C.D., Manning, C.D. and Schütze, H., 1999. Foundations of
 |      Statistical Natural Language Processing. MIT press, p. 162
 |      https://nlp.stanford.edu/fsnlp/promo/colloc.pdf#page=22

(以下略)
一応パラメータの解説部分だけ抜き出してみましたが、流石に多すぎて全部は試せませんので、使いそうなものに絞って試していきましょう。
font_path : string
フォントの場所の指定です。
特に日本語を使う場合は、デフォルトのフォントでは日本語が入っておらず、文字化けします。
そのため、日本語を含んだフォントを指定することが必要になります。
MacもWindowsもシステム内にフォントが格納されているので、そのフォントのパスを指定すれば、日本語でもワードクラウドを表示することができるようになります。
格納されている場所に関しては、こちらの記事で解説されていますので、参考にしてください。
width : int (default=400)、height : int (default=200)
作成されるワードクラウドの画像のサイズです。
デフォルトでは幅400px、高さ200pxとなっているようです。
出力画像サイズを変更するだけなので、特に試してはみません。
prefer_horizontal : float (default=0.90)
縦書きにする文字と横書きにする文字の比率のようです。
floatなので小数で示しますが、多分1が100%横書きで、0が100%縦書きに”しようとする”ようです。
(”しようとする”と書いたのは、0でも100%縦書きにはならなかったから…)
まずは「prefer_horizontal=1」から試してみましょう。
from wordcloud import WordCloud

wordcloud = WordCloud(prefer_horizontal=1, font_path=r"/System/Library/Fonts/Hiragino Sans GB.ttc").generate(words)
wordcloud.to_file("./sample.png")

実行結果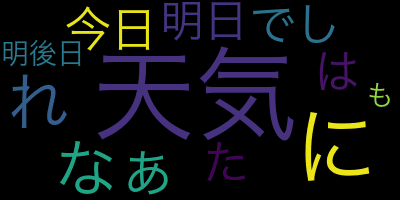
100%横書きになりました。
次に「prefer_horizontal=0」を試してみましょう。
from wordcloud import WordCloud

wordcloud = WordCloud(prefer_horizontal=0, font_path=r"/System/Library/Fonts/Hiragino Sans GB.ttc").generate(words)
wordcloud.to_file("./sample.png")

実行結果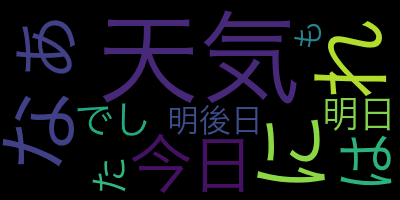
「prefer_horizontal=0」で100%縦書きにはなりませんでしたが、確かに縦書きになるテキストの割合は増えました。
scale : float (default=1)
Scaleはイメージのサイズの拡大率です。
デフォルトが1なので、0.1を試してみます。
from wordcloud import WordCloud

wordcloud = WordCloud(scale=0.1, font_path=r"/System/Library/Fonts/Hiragino Sans GB.ttc").generate(words)
wordcloud.to_file("./sample.png")

実行結果
かなり小さくなってしまいました。
逆に大きくしてみるということで、「scale=2」を試してみましょう。
from wordcloud import WordCloud

wordcloud = WordCloud(scale=2, font_path=r"/System/Library/Fonts/Hiragino Sans GB.ttc").generate(words)
wordcloud.to_file("./sample.png")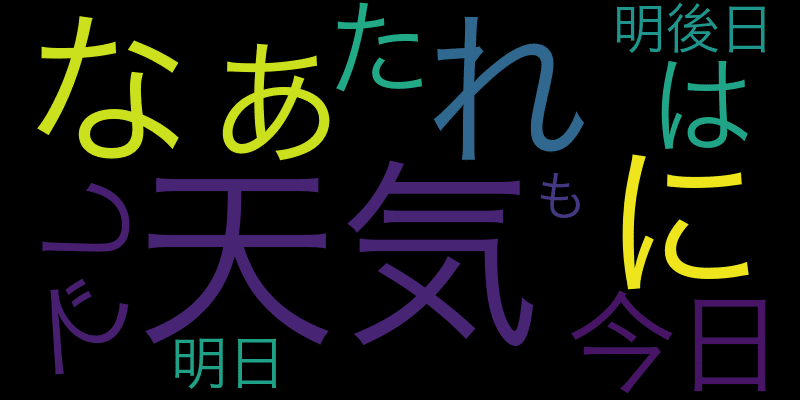
確かに大きくなりました。
同じワードクラウドで異なるサイズを作る際に使えるかもしれません。
min_font_size : int (default=4)
min_font_sizeは一番小さなテキスト(つまり一番頻度が少なかった文字)のフォントのサイズでデフォルトが4。
font_step : int (default=1)
font_stepはワードクラウド上の文字のサイズは頻度に応じて大きくなりますが、頻度が一つ上がった際にどれだけフォントサイズが大きくなるかという値。
max_words : number (default=200)
ワードクラウド上に表示されるテキストの数の上限。
stopwords : set of strings or None
stopwordsは表示しない文字の指定。
オプションとして指定する際、「stopwords={“天気”}」という形で指定する。
from wordcloud import WordCloud

wordcloud = WordCloud(stopwords={"天気"}, font_path=r"/System/Library/Fonts/Hiragino Sans GB.ttc").generate(words)
wordcloud.to_file("./sample.png")

実行結果
「天気」という文字が消えました。
background_color : color value (default=”black”)
background_colorは背景色の指定で、デフォルトは”black”、つまり黒です。
なんでデフォルトを白にしなかったのか気になるところですが、多分白で使う人が多いオプションでしょう。
from wordcloud import WordCloud

wordcloud = WordCloud(background_color="white", font_path=r"/System/Library/Fonts/Hiragino Sans GB.ttc").generate(words)
wordcloud.to_file("./sample.png")

実行結果
mode : string (default=”RGB”)
画像のカラーモードの指定です。
デフォルトはRGBですが、背景を透明にしたい場合はmode=”RGBA”にして、background_color=”None”とするようです。
from wordcloud import WordCloud

wordcloud = WordCloud(mode="RGBA", background_color=None, font_path=r"/System/Library/Fonts/Hiragino Sans GB.ttc").generate(words)
wordcloud.to_file("./sample.png")

実行結果
ぱっと見で背景が透明になっているか分かりにくいですが、確かに透明になっていました。
colormap : string or matplotlib colormap, default=”viridis”
colormapはテキストの色のバリエーションの指定です。
matplotlibのカラーマップが使えるので、こちらのページが参考になります。
今回は「plasma」を指定してみましょう。
from wordcloud import WordCloud

wordcloud = WordCloud(colormap="plasma", font_path=r"/System/Library/Fonts/Hiragino Sans GB.ttc").generate(words)
wordcloud.to_file("./sample.png")

実行結果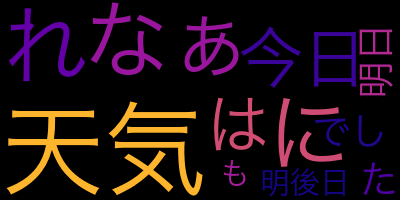
min_word_length : int, default=0
min_word_lengthは単語の最小の文字数です。
デフォルトが0なので、1文字だけのものも表示されています。
今回はmin_word_length=2としてみましょう。
from wordcloud import WordCloud

wordcloud = WordCloud(min_word_length=2, font_path=r"/System/Library/Fonts/Hiragino Sans GB.ttc").generate(words)
wordcloud.to_file("./sample.png")

実行結果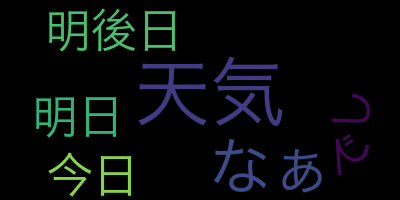
mask : nd-array or None (default=None)、contour_width: float (default=0)、contour_color: color value (default=”black”)
ここからはmaskとそれに関する二つのオプション(contour_width、contour_color)を試していきます。
ただし先ほどまでの文章では文字の量が全然足りないので、形態素解析ライブラリjanomeを勉強したときの記事全文(プログラム含む)をテキストファイルにしました。
ちなみにそのときの記事がこちら。
全文をテキストファイルにしたものがこちらです。
そしてもう一つ必要なものが、画像ファイルです。
どう使うかは後でのお楽しみとして、とりあえずこんな画像を用意しました。
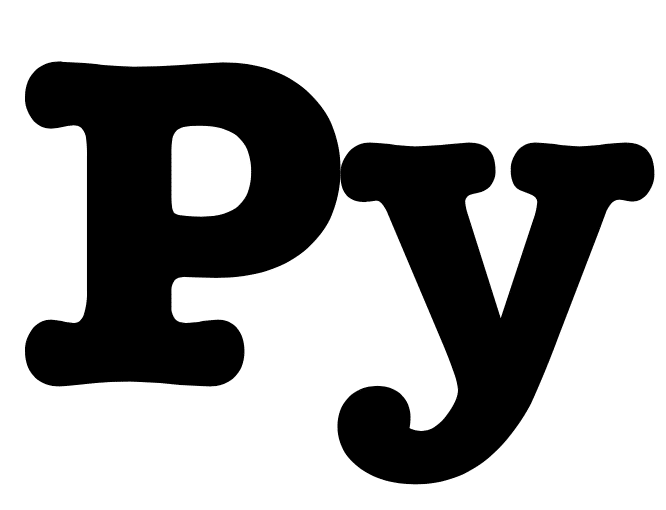
何か分かりますでしょうか?
実はこのウェブサイト「3PySci」のロゴの「Py」の部分です。
これで準備は完了です。
それでは始めていきましょう。
テキストファイルの読み込みと形態素解析
まずはテキストファイルを読み込み、形態素解析をしましょう。
先ほどの「data.txt」をプログラムと同じフォルダに配置します。
そしてjanomeの解説の際に覚えた「分かち書き」をこちらのプログラムで行います。
from janome.tokenizer import Tokenizer

with open("./data.txt", "r") as f:
    data = f.read()

tk = Tokenizer(wakati=True)
tokens = tk.tokenize(data)

words = " ".join(list(tokens))

print(words)
前回と違うのはこちらのデータの読み込みの部分だけです。
with open("./data.txt", "r") as f:
    data = f.read()
テキストファイルを読み込むのによくやるのは、for文を使って1行ずつ読み込むことですが、janomeには一度に渡してしまえるため、「data = f.read()」でテキストファイル全文をそのままdataに格納しています。
あとは前と同様にjanomeのtokenaizerで分かち書きに変換しています。
WordCloudのmaskを試す
それではWordCloudのmaskを試してみましょう。
プログラムとしてはこんな感じになります。
from wordcloud import WordCloud
from PIL import Image
import numpy as np

img = Image.open("./py_img.png")
mask_img = np.array(img)

wordcloud = WordCloud(mask=mask_img,font_path=r"/System/Library/Fonts/Hiragino Sans GB.ttc").generate(words)
wordcloud.to_file("./sample.png")
まず画像をPIL(Python Image Library)で読み込みます。
img = Image.open("./py_img.png")PILに関しては前に解説していますので、良かったらこちらの記事をどうぞ。

そして読み込んだ画像ファイルをnumpyを使ってndarray形式に変換します。
mask_img = np.array(img)そしてndarray形式にした画像データをmaskの引数に入れて、ワードクラウドを作成します。
wordcloud = WordCloud(mask=mask_img,font_path=r"/System/Library/Fonts/Hiragino Sans GB.ttc").generate(words)
wordcloud.to_file("./sample.png")
これで実行してみるとこんな画像が出力されます。
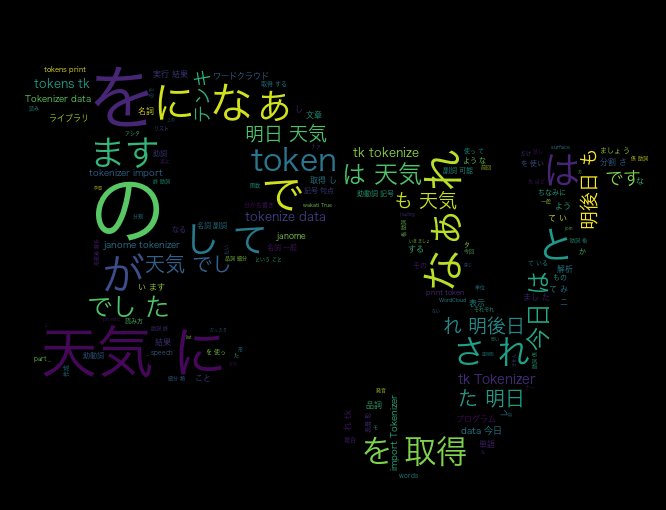
つまりmaskとは、読み込んだ画像の形に合わせてワードクラウドを作ってくれる機能なのです。
背景が黒ではちょっとパッとしないので、白にしてみました。
from wordcloud import WordCloud
from PIL import Image
import numpy as np

img = Image.open("./py_img.png")
mask_img = np.array(img)

wordcloud = WordCloud(mask=mask_img, background_color="white", font_path=r"/System/Library/Fonts/Hiragino Sans GB.ttc").generate(words)
wordcloud.to_file("./sample.png")

実行結果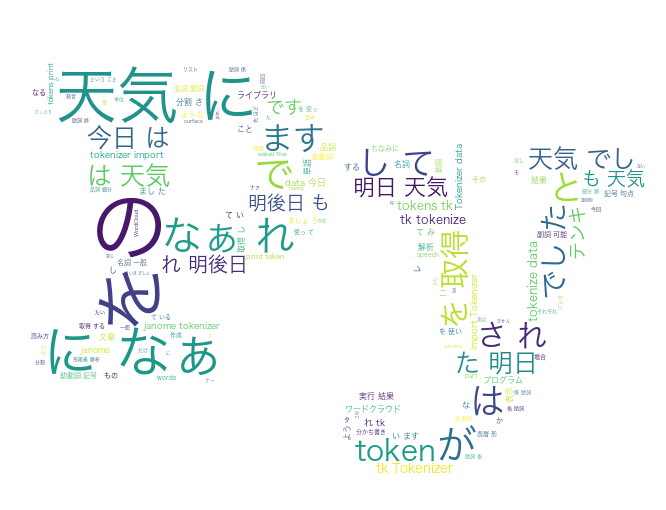
やはり背景は白の方が映えますね。
contour_widthを試す
では次にcontour_widthを試してみましょう。
これはmaskと併せて使う機能なので、先ほどの背景を白にしたプログラムにcontour_widthを追加します。
from wordcloud import WordCloud
from PIL import Image
import numpy as np

img = Image.open("./py_img.png")
mask_img = np.array(img)

wordcloud = WordCloud(mask=mask_img, background_color="white", contour_width=5, font_path=r"/System/Library/Fonts/Hiragino Sans GB.ttc").generate(words)
wordcloud.to_file("./sample.png")

実行結果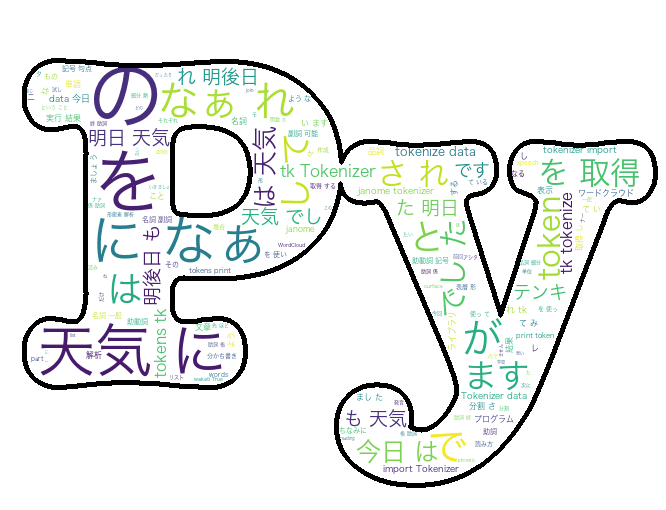
枠線が表示されました。
ちなみにcontour_widthは数字(int)で指定しますが、その数字が枠線の太さを示しています。
contour_colorを試す
ここまで来れば、contour_colorは何か分かるかと思います。
そう、枠線の色です。
枠線を表示した先ほどのプログラムにcontour_colorを追加して枠線の色を変えてみましょう。
from wordcloud import WordCloud
from PIL import Image
import numpy as np

img = Image.open("./py_img.png")
mask_img = np.array(img)

wordcloud = WordCloud(mask=mask_img, background_color="white", contour_color="red", contour_width=2, font_path=r"/System/Library/Fonts/Hiragino Sans GB.ttc").generate(words)
wordcloud.to_file("./sample.png")

実行結果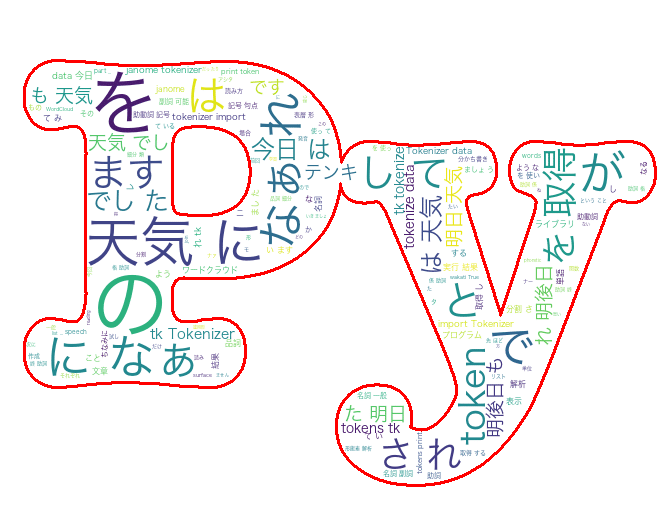
枠線が赤に変わりました。
テキストの色とうまくマッチングさせれば、結構映えるワードクラウドになることでしょう。
問題はそのセンスが私には無いということで…
それにしてもjanomeもWordCloudも面白いライブラリなので、また色々と遊んでいきたいと思います。
ではでは今回はこんな感じで。
コメント