Twitter API v2
前回は、TweepyからTwitter API v2を使って、フォロー、フォロワーの取得を行いました。
今回はexpansionsや〇〇_fieldsなどのオプション引数(パラメーター)を使って、さらに詳細な情報を取得してみましょう。
ただ全てのコマンドに対して紹介するのは流石に膨大すぎて出来ないので、今回は「.get_user」のexpansionsとuser_fieldsを例として、取得方法を紹介します。
また私が必要なものは今後紹介していきますが、皆さんもご自身で試してもらえれば幸いです。
ということでまずはTwitter API v2への接続とユーザーIDの取得からです。
import tweepy

account = 'Your username'
BT = "Your bearer token"

client = tweepy.Client(bearer_token=BT)

def userIdGet(username):
    user = client.get_user(username=account)

    return user[0]['id']

accountid = userIdGet(account)
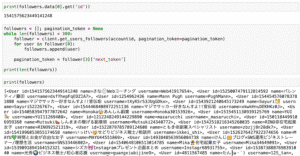
print(accountid)それでは始めていきますが、ここからは私のアカウント(@3PySci_Nori)を例にとって解説していきます。
.get_userの解説を確認
まずはtweepyの「.get_user」の解説を見てみましょう。
これによると引数は以下のものがあるようです。
- id
- username
- expansions
- tweet_fields
- user_fields
- user_auth
「.get_user」は特定のユーザーの情報を取得するコマンドなので、「id」か「username」は必須だと思われます。
つまり「expansions」、「tweet_fields」、「user_fields」、「user_auth」がオプション引数というわけです。
そして「user_auth」は認証方法に関してなので、実際は「expansion」、「tweet_fields」、「user_fields」が追加の情報を取得するためのオプションになります。
ということでこれらのオプション引数をどう使うのか、取得できる情報がどう変わってくるのかを見ていきましょう。
と、その前に比較のためにオプションなしの結果を見てみます。
user = client.get_user(id=accountid)

print(user)

実行結果
Response(data=<User id=1364192130936107008 name=のり@3PySci Python&NoCode&Arduino勉強中👍
username=3PySci_Nori>, includes={}, errors=[], meta={})
expansions
それでは「expansions」のオプションを見ていきましょう。
こちらのページを見ると「.get_user」のコマンドの「expansion」には「pinned_tweet_id」しか使えないようです。
ということで試してみましょう。
expansionsは「expansions=[‘expansionsのコマンド1′,’expansionsのコマンド2’]」というように追加します。
user = client.get_user(id=accountid, expansions=['pinned_tweet_id'])

print(user)

実行結果
Response(data=<User id=1364192130936107008 name=のり@3PySci Python&NoCode&Arduino勉強中👍
username=3PySci_Nori>, includes={'tweets': [<Tweet id=1545237413483913217 text='【Python Tips】
\n\nファイルの拡張を判断するのに、\n\n文字列.endswith(‘拡張子’)\n\nがオススメ👍\n\nfor file in
os.listdir(‘フォルダ’):\n    if file.endswith(‘拡張子’) == True:'>]}, errors=[], meta={})
「includes」の中に今、固定しているツイートが表示されました。
ちなみにこのツイートIDやツイートのテキストを取得するには以下のようにします。
print(user.includes['tweets'][0]['id'])
print(user.includes['tweets'][0]['text'])

実行結果
1545237413483913217
【Python Tips】

ファイルの拡張を判断するのに、

文字列.endswith(‘拡張子’)

がオススメ👍

for file in os.listdir(‘フォルダ’):
    if file.endswith(‘拡張子’) == True:
〇〇_fields
次は「〇〇_fields」の使い方です。
今回は「user_fields」を例にとって解説していきます。
使い方としては「user_fields=[‘userfieldsのコマンド1’, ‘userfieldsのコマンド2’]」というように使用します。
ちなみにtweepyのuser_fieldsの解説ページはこちらです。
ただ正直言って、このページでは情報が足りていないので、わざとエラーを出してみます。
user = client.get_user(id=accountid, user_fields=['fields'])

print(user)

実行結果
---------------------------------------------------------------------------
BadRequest                                Traceback (most recent call last)
Input In [22], in <cell line: 1>()
----> 1 user = client.get_user(id=accountid, user_fields=['fields'])
      3 print(user)
(中略)
BadRequest: 400 Bad Request
The `user.fields` query parameter value [fields] is not one of
[created_at,description,entities,id,location,name,pinned_tweet_id,profile_image_url,
protected,public_metrics,url,username,verified,withheld]
これで「user_fields」として使えるものは以下のものであることが判明しました。
- created_at
- description
- entities
- id
- location
- name
- pinned_tweet_id
- profile_image_url
- protected
- public_metrics
- url
- username
- verified
- withheld
それぞれどのようなものかはご自分で試していただくとして、多分よく使うものは「description」や「public_metrics」だと思われます。
ということで「description」と「public_metrics」を例に使い方を紹介していきます。
まずは「description」を試してみましょう。
user = client.get_user(id=accountid, user_fields=['description'])

print(user)

実行結果
Response(data=<User id=1364192130936107008 name=のり@3PySci Python&NoCode&Arduino勉強中👍
username=3PySci_Nori>, includes={}, errors=[], meta={})
「あれ?」と思った方、大正解。
最初のオプションなしと同じ結果になりました。
実は「〇〇_fields」で取得したデータは単に全体をprint関数で表示しようとしても、表示されません(この仕様のせいでかなりの時間を浪費しました)。
表示させるには、そのデータまでを指定しなければいけません。
今回の「description」に関しては「data」の中にありますので、「user.data.desriotion」というように指定します。
user = client.get_user(id=accountid, user_fields=['description'])

print(user.data.description)

実行結果
3PySciの管理人😆 #プログラミング (特に #Python )や #ガジェット 、 #Apple 好きな方と繋がりたいです☺️
#NoCode 、#Django 、 #Arduino ( #M5StickC )なんかもいじってます🙄GitHub https://t.co/2WPxcNoGVC
ということで「description」はそのユーザーのプロフィールページの紹介文のことでした。
次に「description」と「public_metrics」の両方を一度に取得してみましょう。
この場合はリストとしてオプション引数に指定します。
user = client.get_user(username=account, user_fields=['description', 'public_metrics'])

print(user.data.description)
print(user.data.public_metrics)

実行結果
3PySciの管理人😆 #プログラミング (特に #Python )や #ガジェット 、 #Apple 好きな方と繋がりたいです☺️
#NoCode 、#Django 、 #Arduino ( #M5StickC )なんかもいじってます🙄GitHub https://t.co/2WPxcNoGVC
{'followers_count': 6584, 'following_count': 6813, 'tweet_count': 5999, 'listed_count': 20}
「public_metrics」はフォロワー数、フォロー数、ツイート数、リストされている数でした。
Twitter API v2にしてものすごく困ったことの一つとして、今回のオプション引数の使い方がありました。
正直言ってかなりの時間をここに費やしましたので、他の方はそうはならないでほしいなという思いでこの記事を書いています。
ということで多くの方に届きますように。
次回はTwitter API v2を使ってツイートする方法を見ていきましょう。
ではでは今回はこんな感じで。
コメント